Tuesday, 7 December 2021

Satsuma Street Deck The Halls Christmas Cross Stitch

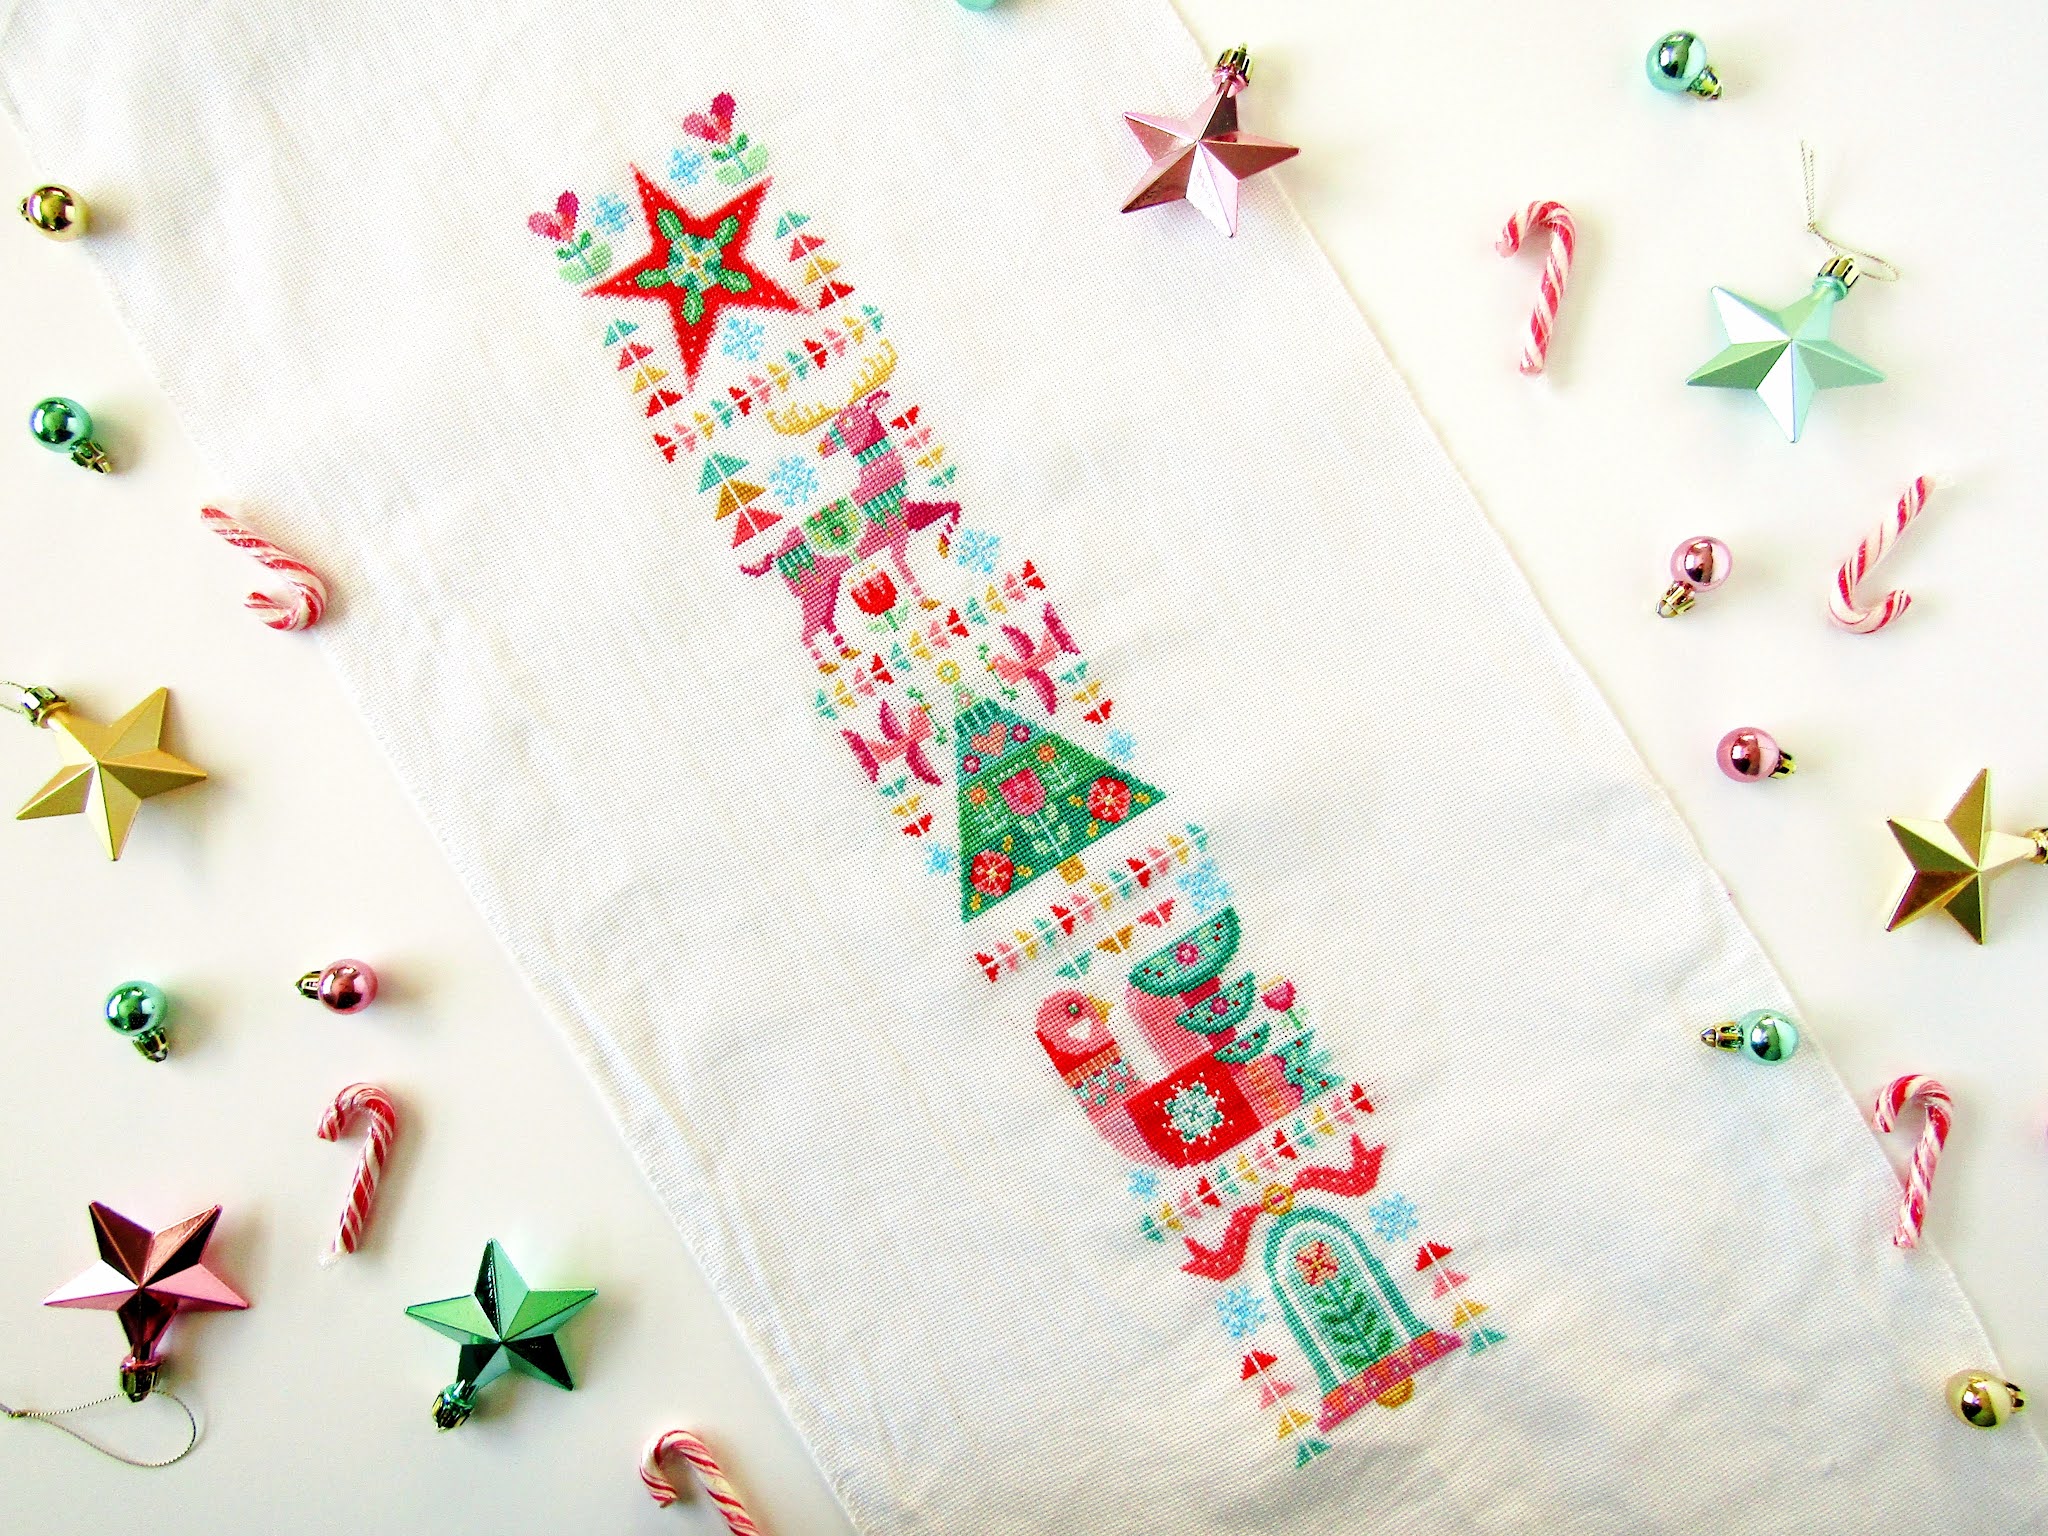
A couple of Christmases ago, I began stitching Satsuma Street's colourful Deck The Halls cross stitch wall hanging, and a few weeks ago, I finally finished it! 

I'm so pleased to finally have it completed after all this time, and I'm really happy with the end result- especially as I had to make a couple of colour changes, and struggled to figure out what to do with it near the end.

It should have been a fairly quick project, and I was close to completing it last Christmas, but I stopped and started it, couldn't decide which colour thread to use for the snowflakes, and took ten months to make it down to Hobbycraft to choose. So something that could've taken me a month to stitch, ended up taking two years. 

I was drawn to the Deck the Halls pattern because of how unique and colourful it was. It's so different to all the other Christmas designs you see at this time of year, and while it has a Scandinavian feel, it's nothing like the typical red and white patterns that are everywhere at Christmas time. (Which I'm sooo bored of these days). It's bright, colourful, and cheerful, and I love that about it.

It's made up of five main sections, including a star, reindeer, Christmas tree, dove, and bell as the centrepieces, with smaller flowers, snowflakes, and arrows making up the rest of the design in lots of reds, greens, yellows, and pinks. It's been designed so that you can stitch it as one long wall-hanging picture, or as five separate pieces, which is really clever. I obviously chose to make it as one picture, but I think it would look just as beautiful broken up in to five. If you're new to cross stitching, you'll probably find it less intimidating that way, but it's an easy project with no complicated stitches or patterns, and anybody should be able to make it once they've mastered the basics.

The pattern comes as a full-colour downloadable PDF, with an easy-to-follow chart, and a list of recommended materials to help you get started. Satsuma Street suggest using a natural-coloured Evenweave, but that didn't appeal to me aesthetically, and I chose to make it on 16-count white aida to make the colours pop, and so that the end result would be a little larger. I'm so glad I did, as I personally think the colourful threads look so much better against the white background.

The only issue with using white aida is that there are white threads in the pattern, which obviously blend in to the fabric. I tried lots of different colours in place of white- cream, lemon, lilac, blue, silver, and more- but I didn't like any of them, and became chronically uninspired. I ended up putting the cross stitch aside last Christmas for ten months, until I finally made it down to Hobbycraft in October to shop for some new threads to try. In the end, after trying more colours, I went back to white for the lines through the arrows, and blended a strand of white and a strand of turquoise for the snowflakes. I'm not 100% happy with the colour choice for the snowflakes, but it's the best I could do, and I like to think it works with the other colours in the picture. Either way, I refuse to change them again. I actually got the picture framed last weekend, so there's no going back now!

Despite the colour-matching issues at the end, overall it was so much fun to sew, and has to be one of my favourite makes ever. The colourful projects are always the most fun to stitch. If you're looking for a modern, colourful cross stitch picture to make this Christmas, I couldn't recommend it to you more.

I now want to try more of Satsuma Street's patterns, and have bought their set of Christmas baubles patterns, which I'm going to begin as soon as I get a spare second. I don't expect to get very far this Christmas, as there's always a million other things to do, but I'm sure I'll keep you updated on my progress on Instagram.

Have you cross stitched or crafted anything so far this Christmas?         

You Might Also Like

The Make Arcade Gingerbread Man Cross Stitch

My Christmas Cross Stitch Makes

Mid Century Maude Retro Reindeer Cross Stitch

Merry Christmas Patchwork Cross Stitch Sampler

My Christmas Cross Stitch Makes 2016

My Christmas Cross Stitch Makes 2015

Noel Peace on Earth Christmas Cross Stitch Sampler                                                                                          

SHARE:

Saturday, 11 April 2020

DIY Pastel Pom Pom Easter Crackers


Last Easter, I made some pastel-coloured Easter crackers to make our family Easter meal that little bit lovelier. I never did find the time to blog about them last year, but I saved the photos and thought I'd show you them today in case you fancy making some of your own this Easter weekend. (Of course, it's a little too late to purchase cracker kits in time for Easter now, but you could download a cracker template from the Internet and print your own on some colourful card).


My family and I always have an Easter roast on Easter Sunday and I like to make our table look as colourful as possible, so I decided to make crackers in a variety of pastel colours to compliment our colourful, mismatched Easter table linens and crockery.

I bought a selection of single cracker kits in lavender, pastel yellow, pale blue, and flamingo pink from the craft and party supply website, Little Crafty Bugs, who stock a wide variety of inexpensive cracker kits in different colours and sizes for every event imaginable. Their cracker kits are so good I've repurchased several times over the last few years whenever I've made crackers for Easter or Christmas, and even put in another order last week to make another batch for tomorrow's Easter meal, which I'm hoping to make later today. I then picked up some small pom poms from Hobbycraft, and chose satin ribbons in contrasting pastel colours from my stash to decorate them with. For the filling, I decided to treat everyone to some caramel chocolate bunnies from Hotel Chocolat (which are just amazing), and also bought a scratch card to pop in each one. (Sadly nobody won the gold). Then I got to work.


The crackers were so easy to make, and as I kept the designs simple, they didn't take long to make at all. I think I made all six in under half an hour. The process is really simple, and here's how to make them if you'd like to give cracker making a try. 


How To Make These Crackers

What You'll Need

♥ 1 cracker kit per person.
♥ 2 lengths of ribbon per cracker. (I used satin ribbons from Hobbycraft).
♥ 2 pom poms per cracker.
♥ Scissors.
♥ Hot glue gun and glue.
♥ Mini chocolate Easter bunnies, eggs, or whatever contents you desire. (I used caramel chocolate bunnies from Hotel Chocolat).
♥ Confetti (optional).

What To Do

1. First, take your flat-packed cracker, and stick a cracker snap in place with Selotape length-ways down the centre of the cracker.
2. Push out all of the diamond card pieces from the diamond cut-outs.
3. Roll the card in to a cylinder shape, and slot the three tabs in to the three slots.
4. Take a length of ribbon, and positioning it under the diamond cut outs, cinch it in and tightly tie it in place. This will pull in the end of the cracker and create the traditional cracker shape. Cut the ends of the ribbon diagonally to prevent them from fraying.
5. Place a paper crown and a joke in to the cracker, and drop in your confetti and contents. I popped caramel chocolate bunnies from Hotel Chocolat and a scratch card in mine, but you could add in whatever small treats you like.
6. Tie up the other end of the cracker by repeating step 3.
7. Heat up your glue gun, and glue a couple of pom poms along the centre of the cracker. Leave to dry for a couple of minutes. And voila, you're done!

Simple as that.

As well, as making pastel Easter crackers for our meal, I also made a couple more in rose pink and yellow, which I sent to my sister and brother-in-law in their Easter parcel last Easter.


The crackers seemed to go down really well with my family, and they were just so fun to make. I think they added a little something extra to our Easter dinner table, and definitely brightened up the table. And let's face it, who doesn't love snapping open a cracker full of chocolate?


I liked these pastel pom pom crackers so much, I think I'm going to do something similar with this year's Easter crackers. I obviously couldn't get scratch cards to put in them this year, but I have managed to pick up some more Hotel Chocolat Easter chocolates online to give my family a treat. I'll be sure to post a photo of them on my Instagram, so keep an eye on my grid and stories this weekend if you'd like to see what I come up with.

Have you ever made Easter crackers for an Easter meal or party?

You Might Also Like
SHARE:

Monday, 24 December 2018

DIY Easy Christmas Hoop Art


Merry Christmas Eve, everyone!

I can't believe it's Christmas Eve already; where has this month gone?? December has just flown by this year, and I've been so busy preparing for Christmas, I've barely had a chance to stop and enjoy it. I wish time would slow down a little! I haven't even managed to get in to the Christmas spirit yet. For some reason, I'm just not feeling it this year.

I'm sure all that will change today, as Christmas Eve has always been one of my favourite days of the year. My sister and brother-in-law are arriving home from Germany this morning with their dog, Mia, and I'm planning to spend the next few days enjoying Christmas at home with my family, and having a well deserved rest after a hectic month. After I finish the last few errands today, I'm fully intending to watch lots of Christmas movies, eat my body weight in delicious food, spend some quality time with the family, and maybe even push the boat out and play a board game or two. I can't wait!

I'm sure most of us will be busy wrapping presents, prepping food, and travelling to spend Christmas with our families and friends today, but I wanted to squeeze in one more Christmas craft before Christmas Day. You probably won't have time for any last minute crafting, but if you're looking for a fun festive project to make over the next few days, or need some unique last minute Christmas gifts or decorations you can easily make by hand, I have one last Christmas craft I think you're going to love. And that's my easy DIY Christmas fabric hoop art.


I recently realised that while I've featured photos of my hoop art on my blog and social media pages before,  I've never shared a tutorial on how to make them, so I thought it was about time I did.

I started making my own hoop art a few Christmas ago by framing patterned fabric in simple wooden embroidery hoops, sometimes adding embroidery but often leaving the fabric plain, and finishing the backs with some felt, I find the process and end result so satisfying, I haven't been able to stop making them since! It's such a fun and simple craft to make, but they look so effective and make a great statement on any wall- especially when multiple hoops are displayed together in a big group. A hoop art wall will certainly add a unique and personal touch to your Christmas decor, and is sure to be a conversation starter with your guests this Christmas.


Hoop art doesn't just make great Christmas decor, but can also make lovely presents for friends and family, too- especially those who appreciate crafts, and handmade presents. You can even personalise them for the recipient by using fabric and colours relating to their likes and interests, and embroidering their name, a quote they love, their favourite things, or even their pet(s) on to the fabric. A piece of hoop art would make a lovely stand-alone gift, or you could also add one to stockings, hampers, or even Christmas Eve boxes. It's up to you to decide how to gift them. Hoop art doesn't even have to follow a festive design if you don't want it to- you can use non-festive fabric and create them for any occasion throughout the year! To date, I've made lots of Christmas and Easter hoop art, and even some colourful designs for every day, too. The hoops in the photos are a selection I've made over the years using fat quarters from Hobbycraft. (You can find the polka dot fabric here).

If you'd like to learn how to make your own hoop art, follow my super easy DIY below. (Step-by-step photos coming soon).


How To Make Christmas Hoop Art

You Will Need

♥ Embroidery hoops in various sizes. (The hoops I used range from 3 to 10 inches).
♥ Christmas print fat quarters / fabric.
♥ Felt.
♥ Scissors.
♥ Fabric pen / pencil. (If you don't have one a pen or a pencil will do).
♥ Sewing needle.
♥ Thread.
♥ Glue gun and glue stick. (Optional).

How To Make a Piece of Hoop Art

1. Gather your supplies.
2. Iron your fabric until it's completely crease-free.
3. Take a piece of fabric and an embroidery hoop. Place the inner hoop underneath the fabric and the outer hoop on top, move them around until you find a layout you're happy with, and frame the fabric in the hoop.
4. Pull on the edges of the fabric and tighten the screw on the hoop until the fabric sits tightly in the hoop like the hide on a drum.
5. Trim the edges of the fabric at the back, leaving them about an inch long.
6. Thread your needle with two strands of thread, and use a running stitch to cinch in and secure the fabric at the back of the hoop. You could alternatively trim the fabric down further, and glue it tightly to the back of the hoop with hot glue.
7. Take a sheet of felt, a fabric pen, your hoop, and scissors.
8. Lay your hoop on to the felt, and draw around it.
9. Take your scissors and cut the circle out of the felt.
10. Now attach the felt to the back of your hoop. You can either sew it to the back of the fabric using a blanket stitch OR glue it to the hoop using a hot glue gun. You just want to ensure the felt is nice and taut once you're finished.

And voila, your first piece of hoop art is complete!

Yes, it really is that simple! There really isn't a lot to this style of hoop art, so even the most inexperienced crafter will have no trouble with this DIY.


If you're in a rush, or want to create some temporary hoop art just for the holidays, you can get away with not adding felt to the back of the hoops, as you aren't going to see the backs once they're on the wall. Leaving them unfinished will make it easier to switch up the hoops with new fabrics if you want to change them for different seasons, trends, or occasions. However, if your walls are a dark colour, the colour will likely show through the fabric as fat quarters are generally made of thin fabric, so finishing them with felt is always recommended. It will also keep your hoops looking their best for longer.

I've kept the majority of my hoop art plain and simple because I think the fabrics make a great statement as they are, but you could do so much more with them than I have. You could use any fabric you like, and add embroidery, sequins, buttons, beads, pom poms, present toppers, ribbons, and even applique other fabrics on top. As for the hoops, you could paint them in different colours, or wrap them in colourful threads, yarn, or even washi tape. You'll find so many amazing examples on Pinterest and Instagram that put mine to shame!


I wish I had painted or wrapped all of my hoops- adding some colour to the wood definitely gives them a little something extra. Lately, I've also thought about turning them in to baubles for the festive season by adding some light grey felt in the shape of a bauble hanger to the top of the hoops, but I haven't found the time to customise them this Christmas. I'm definitely going to give it a go next Christmas, though, and I'm already planning on making more elaborate designs in 2019 by adding embroidery and designs in other fabrics, so keep your eyes peeled for those!


To display your hoop art on the wall, play around with different layouts on a flat surface until you find one you like, and then you can start hanging them. Start from the centre point, and work your way out. I find command strips are perfect for hanging hoop art on concrete / brick walls, but you may need to trim them down for the smaller hoops. Of course, you could also hang them with nails or picture hooks etc., the choice is yours.

And that is how to make your own Christmas hoop art.

I hope you've found my tutorial helpful! If you decide to make your own hoop art, make sure you leave me a link to your photos in the comments below so I can check them out! I'd love to see any hoops you make.

Have a wonderful Christmas, and a very Happy New Year!

Have you ever made your own hoop art and will you be giving my tutorial a go?

You Might Also Like
SHARE:

Friday, 21 December 2018

DIY Christmas Pudding Pom Pom Wreath


It's been a year since I made my first ever Christmas wreaths- some simple DIY felt and pom pom wreaths-  and now I know how fun and easy they are to make, I've been looking forward to making some new festive designs ever since.

As you'll know, Christmas wreaths are traditionally made from foliage- most commonly boughs of evergreen or holly decorated with natural decorations like dried orange slices, cinnamon sticks, pinecones, berries, and seed pods, and finished with festive ribbon. The wreath I made a few weeks ago? It's about as far from traditional as you can get!

I decided to do something a little different this year and made a Christmas pudding pom pom wreath! A wreath in the shape and colours of a Christmas pudding made almost entirely out of pom poms!


I was inspired to create this wreath after stumbling up on a Christmas pudding pom pom wreath craft kit in John Lewis this Autumn. I'll admit I was tempted to buy it but it was expensive and over-priced, and I knew I could make my own for a fraction of the price, so that's what I decided to do. If I can make something myself, I will usually give it a go. I got myself down to Hobbycraft, bought the supplies, and saved myself about £15 in the process! The materials for the wreath came to just £7- although, I already had my own glue gun, glue, and pom pom makers, which will set you back around a further £10. £17 is still extremely reasonable for a wreath- especially a handmade one- and much cheaper than many mass-produced wreaths you will find in store. I personally think it was worth every penny!

Back in November, I set to work, and spent a few evenings making close to fifty brown and white pom poms while relaxing in front of the TV. Once I had enough, I was able to start building my wreath. This part was so easy and therapeutic, and while I spent two evenings putting it together, it only took me two or three hours in total to complete the construction process. You could easily make the entire wreath in an afternoon if you'd prefer to make it all in one go, so it's the perfect rainy day craft. (And let's face it; we've been having a lot of those kinda days this December!)

I'm really pleased with how well my wreath turned out for a first attempt. I don't know why I'm so surprised it worked out, because it was one of the easiest and simplest crafts I've ever made, but I didn't expect it to take shape so well.


If I'm honest, I would have liked to have added an extra circle of pom poms to the centre, and a another layer of pom poms along the middle of the two rows I've created, but I ran out of wool, and decided to keep it simple to keep the cost down. If my wreath is a little flat and uniform for you, though, you could add more pom poms to make it fluffier. You'll just need to buy two balls of each shade of wool instead of one, and attach the extra pom poms to the others with hot glue.

Don't worry if you're new to crafting or not particularly crafty at all, this Christmas pudding pom pom wreath is so easy to make. Anybody could make it- even older children. You don't need to have craft skills or experience to be able to make one, just the ability to use your hands, and a little patience (because making forty-two pom poms soon loses its appeal). Trust me, if I can make this without following a tutorial, you sure can! I'm not a skilled crafter. If you'd like a little guidance, however, I'm here with a tutorial for you to follow.

Unfortunately, I don't have step-by-step photos to guide you today, as the ones I took turned out so badly I couldn't salvage them or share them with the world. I've had to make do with these photos as I've not been able to reshoot them, but I will try to add tutorial photos at a later date if you want to bookmark this post and return to it later. In all honesty, this wreath is so easy to make, I think you'll know how to make it just by looking at my finished wreath.

How To Make A Christmas Pudding Pom Pom Wreath


You Will Need

♥ Flat wreath frame. (I used a metal 10 inch frame. You can go bigger or smaller if you'd prefer; you'll just need more wool for the pom poms if you go with a larger size).
♥ 100g ball of brown wool.
♥ 100g ball of white wool.
♥ 45mm pom pom maker.
♥ 4 small red pom poms.
♥ Dark green felt. 
♥ Scissors.
♥ Hot glue gun and glue stick.
♥ Fabric pen / pencil. (If you don't have one, a Biro will do).
♥ Green embroidery thread.
♥ Sewing needle.


How To Make The Pom Poms

1. Gather your brown and white wool, pom pom maker, and scissors.
2. Take your pom pom maker, and wrap wool tightly around one side until the arch closes in (about five layers), then close it shut.
3. Repeat step 2 on the other side of the pom pom maker.
4. Using your scissors, cut through the centre of the wool on both sides, being careful to hold the pom pom maker tightly closed as you work.
5. Thread a length of wool through the centre of the pom pom maker, tie it tightly in place, and double knot.
6. Carefully open your pom pom maker, and remove the pom pom.
7. Roll the pom pom between your hands, and use your scissors to neaten it by trimming off any uneven strands of wool.
8. Repeat until you have approx. 22 brown pom poms, and 20 white. (You'll obviously need more if your wreath frame is larger than mine).


How To Make The Holly Leaves

1. Draw two holly leaves on to the green felt, and cut out with sharp scissors. (If you're not good at drawing free-hand, just Google for a holly leaf template, print or trace it, and draw around it).
2. Thread a needle with two strands of green embroidery thread.
3. Backstitch a line of thread down the centre of the leaf, and add four or five pairs of diagonal stitches either side of the line so that they each form a v-shape. This will create the 'veins' of the leaf.

If you're not handy with a needle, you don't have to embroider the leaves; they'll look just as great without it, too. I am a stitcher, so I decided to embroider mine at the last minute to give my wreath a little extra something, and to add some texture.

How To Assemble Your Wreath

1. Take your wreath frame, pom poms, scissors, glue gun, glue, and holly leaves.
2. Starting at the bottom centre of the wreath frame, take a brown pom pom, and tie it tightly to the outer ring of the frame. Double knot it in place, and trim off the excess wool.
3. Now tie a brown pom pom directly above it on to the inner ring. Tie, knot, and trim.
4. Continue tying brown pom poms to the frame besides the others until you've filled at least half of the wreath frame.
5. Now repeat the process with the white pom poms, until the rest of the frame has been filled, and the circle is complete.
6. Next, take your glue gun, and add a little glue between pom poms to stick any loose pom poms together. This will help to keep everything in place. You can do this as you go along, but I personally think it's best to wait until all the pom poms are in place, and you know you're happy with your layout before gluing anything together.
7. Add a little glue to the back of the holly leaves, and stick them at an angle just off centre at the top of the wreath.
8. Take your little red pom poms and glue them in a diamond shape between the two holly leaves at the top centre of your wreath.
9. (Optional). Tie a length of ribbon to the back of the wreath at the top centre to hang it from. I'd recommend using a wide ribbon and matching it to one of the four colours in the wreath. You could also hang the wreath using a wreath hanger, command strip, or a nail on the wall, so you don't have to add a ribbon if you don't want to.
10. Voila, your Christmas pudding pom pom wreath is complete! Well done!


And now all you have to do is hang it on your door or above the fire place, and admire your hard work! I'd recommend hanging it indoors, unless you have a sheltered porch, as it's not weather-proof, and will get ruined by the elements.

So, there you have it; that's how easy it is to make your own Christmas pudding pom pom wreath. There really is nothing to it, so what are you waiting for?

If you decide to make your own Christmas pudding wreath, be sure to leave me a link to your photos so I can check it out- I'd love to see them! If you haven't got time to make one this Christmas, why not bookmark this post to come back to next Christmas?

Will you be making a Christmas pudding pom pom wreath this Christmas?
You Might Also Like
DIY Christmas Pom Pom Wreaths
DIY Christmas Eve Box 2018
DIY Hobbycraft Nutcracker Christmas Crackers
DIY Retro Reindeer Christmas Cross Stitch
SHARE:

Wednesday, 19 December 2018

DIY Christmas Eve Box 2018


Christmas Eve Boxes have become increasingly popular with people of all ages over the last few years, with more and more people putting one together to enjoy with their families on Christmas Eve.

If you're unfamiliar with the Christmas Eve box (where have you been?), a Christmas Eve box is basically a hamper of goodies to enjoy as you wind down on Christmas Eve and get excited for Christmas morning. Think cosy new pyjamas, slippers, Christmas movies, hot chocolate, tasty snacks, scented candles, a festive-themed book, a face mask, glittery nail polish... and anything else you might need for the perfect festive night in. 

You could make one for the whole family, for your kids, to enjoy with your partner, or even just for yourself. There are no rules to conform to here; the beauty of the Christmas Eve box is you can personalise it for your needs, and use it however you like. Gift it, share it, or make one for yourself; it's completely up to you!

The Christmas Eve box is a wonderful tradition to add to your Christmas Eve rituals, particularly if you have young kids or have just got married, and are looking to implement some new family traditions you can look forward to every year. It's the perfect way to enjoy a quiet Christmas Eve evening at home, and having a box full of treats to discover should help distract children from that unbearable longing to open all the presents under the tree and the agonising Millenia-long wait for Christmas morning. 


As I can't travel to my family's Christmas Eve party anymore, and now spend Christmas Eve at home, I've been creating a box to enjoy each Christmas for three or four years now. I'm single and don't have kids, so I mostly just compile them for myself, but I also fill them with a few things to share with my family, like chocolates truffles and hot chocolate. I've been putting the finishing touches to this year's Christmas Eve box this week, so I thought it was about time I showed you what I've put in it this year.


So, what have I put in my Christmas Eve box this year?

♥ A new pair of Christmas pyjamas to cosy up in on Christmas Eve night.

♥ A couple of Christmas movies to watch. And yes, Santa Claus the Movie and The Muppet Christmas Carol are the best Christmas movies ever!

♥ A new festive book- A Literary Christmas- to read before I fall off to sleep. It's full of Christmas stories, passages, poems, and illustrations from the greats.

♥ Yankee Candle votives in Frosty Gingerbread and Snowflake Cookie to make the house cosy and smell delicious.

♥ A tub of peppermint hot chocolate for everyone to enjoy.

♥ A new Cath Kidston snowman print mug for my hot chocolate.

♥ Some chocolates, including Mint Lindor Truffles and Ferrero Rochers (my faves) to share with my family.

♥ Some peppermint candy canes to share around.

♥ A bag of salted popcorn for enjoying while we watch Christmas movies.

♥ A glittery gold Ciaté nail polish so I can make my nails look pretty for Christmas Day. I'm also intending on using one of the red polishes from my OPI Advent calendar.

♥ A L'Oreal Clay Mask so I can pamper myself ready for Christmas Day.

♥ A Peppermint Candy Cane shower gel and  body butter from The Body Shop to make myself smell like a candy cane.

♥ A Body Shop Peppermint Candy Cane soap to put out for the rest of the festive season.

I will likely also add a small Christmas cross stitch to work on while I relax at the end of the day, but I forgot to add one to the box for photos.


Here are a few more ideas for things you could include:

♥ Slippers.
♥ Novelty Christmas socks.
♥ A hot water bottle. (And heat patches may be handy if you have a chronic illness or injury!)
♥ Festive costume jewellery, such as novelty earrings or brooches.
♥ Little Christmas craft kits- such as a mini cross stitch kit or felt ornament kit.
♥ A Christmas colouring book and coloured pencils.
♥ Festive stationery.
♥ Christmas false nails or nail wraps.
♥ Seasonal-scented bubble bath.
♥ A Christmas bath bomb.
♥ Hand cream or body lotion.
♥ A cute soft toy.
♥ A Netflix / Amazon Prime gift card / subscription for Christmas movie watching.
♥ A Christmas scratch card.
♥ Something alcoholic.
♥ Marshmallows.
♥ Favourite edible treats.
♥ Mince pies, stollen, panettone, cake, biscuits, cheese boards, etc.
♥ A new Christmas dress / top / shirt etc.
♥ A new ornament to hang on the tree.
♥ A Christmas stocking so you can hang it up ready for Santa.
♥ A bag of reindeer food.
♥ A selection of Christmas books (for younger readers), a novel for adults.
♥ Little toys.
♥ A special plate for Santa's mince pie.

I'm on a tight budget this Christmas so I've presented everything in a festive gift box I already had lying around the house, but you could also use a wicker basket, gift bag, Christmas stocking, crate, festive tote bag, or any container you like. If you're giving it as a gift, I'd recommend wrapping everything up in festive wrapping paper or tissue to make it look pretty and add to the fun and excitement, but you can leave everything unwrapped if the thought of wrapping any more presents is making you shudder. 


There are so many ways you could then decorate your Christmas Eve box, from adding the recipient's name using stamps or individual letters, to embellishing it with pom poms, garlands, or little decorations. The possibilities are endless. I haven't decorated mine as the box I've used is actually my memory box and needs to be refilled after Christmas, but I admit I was tempted to go to town on it! 


I'm really looking forward to enjoying the contents of my Christmas Eve box in a few days time. I always find these boxes make my Christmas Eve evenings that little bit lovelier and are perfect for creating a relaxing night in, which is always welcome after such a hectic month. I'm looking forward to getting in to my festive PJs, watching a few Christmas movies with my family, indulging in a few treats, and reading a few chapters of my new book before I fall off to sleep in the early hours of Christmas morning. Bliss. Christmas Eve can't come soon enough! 

Will you be making a Christmas Eve box this year? What goodies would make up your perfect box?

P.S. Please excuse how atrocious today's photos are. I know they're beyond awful. The left half of my laptop screen keeps flickering and turning grey, so I'm finding the editing process even harder than usual. I'm awful at photo editing as it is, so they can't be good! Sorry, guys!

You Might Also Like
What's In My Christmas Eve Box? 2016
What's In My Christmas Eve Box? 2015
What's In My Christmas Eve Box? 2014
SHARE:

Saturday, 15 December 2018

DIY Hobbycraft Nutcracker Christmas Crackers


On Thursday, I finally found the time to make this year's Christmas crackers and take the photos I needed to blog about them, so of course, I'm here to blog about them today.


If you're a long-time reader of my blog, you'll probably know that I love to make my own Christmas crackers and do so every year. I've been making them instead of purchasing a generic ready-made set for around a decade now, and it's something I look forward to doing every Christmas.

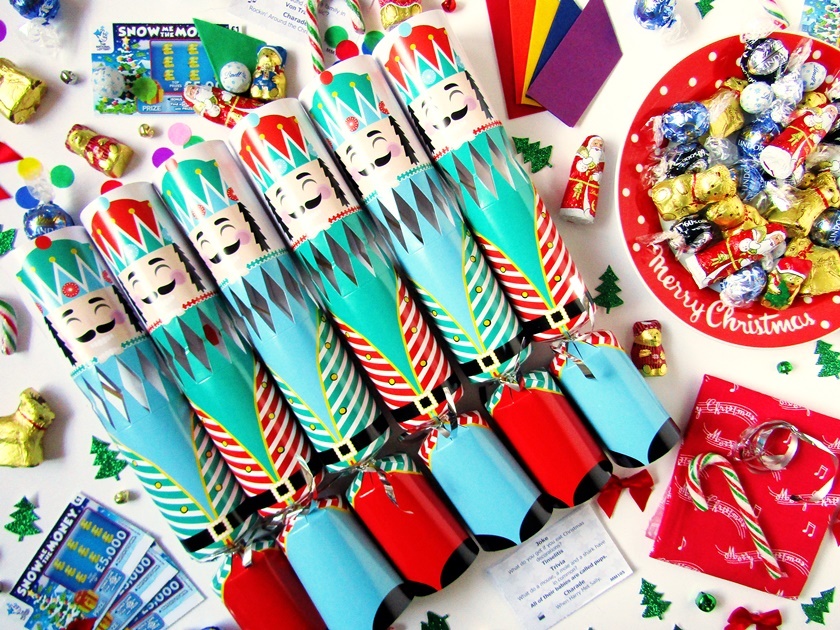
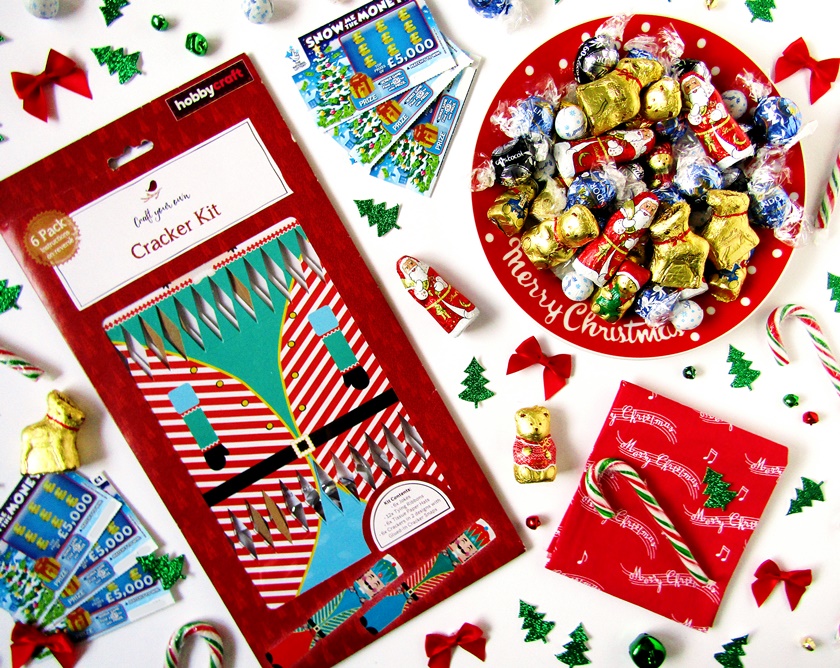
I was tempted to make my own crackers entirely from scratch this year, but then I saw this amazing Nutcracker Christmas cracker kit in Hobbycraft for just £4, and they looked so cute, I just couldn't resist them. This set of six crackers features a nutcracker design in vibrant red, blue, and green, with stripes and accents of yellow, black, and white. As you can see, they come in two complimenting colour-ways, and the set includes three of each design.


The crackers come flat packed ready for you to make, and the set includes cracker snaps, paper crowns, jokes, and silver curling ribbons. You just need to buy little gifts to fill them with, and then you can start constructing them.


These crackers are so ridiculously easy to make that almost anybody could make them- including children. All you have to do is roll the cracker in to a cylinder shape, slot the three tabs in to the slots, cinch one end with ribbon, fill it with treats, tie up the other end, and voila, you're done! I can make all six crackers in as little as ten or fifteen minutes (when I'm not stopping to take photos as I go along), but on your first attempt, it may take you a little longer to get the knack. You'll definitely be able to make them within half an hour, so it's the perfect craft to enjoy if you want to do some Christmas crafting but have little time to spare during the hectic festive season.


This year, I've filled my crackers with colourful confetti, Christmas scratch cards, and a selection of festive Lindt chocolates. I was planning to do something a little different this year, but my Mum came back from Costco last month with a huge pack of Lindt chocolates for me to use, and I was hardly going to turn away free chocolate. They'll definitely be a welcome treat on Christmas Day. I also decided to add a £1 scratch card to every cracker as an extra surprise, and to make Christmas dinner that little more exciting. It's unlikely anyone will win the jackpot, but you never know, it could happen, and the possibility of winning a couple of quid is always fun. Fingers crossed they're all winners! 

Helpful tip: if you want to add a scratch card to your crackers, make sure you stick a penny to the back with washi tape so everyone can enjoy them around the dinner table!


Of course, you don't have to stick to chocolates or scratch cards when filling your own crackers; you can fill them with all kinds of small treats. You could use: mini beauty products, make up, nail polishes, lip balms, hair accessories, costume jewellery, small toys (figurines, wind up toys, bouncy balls etc.), stickers, pens and pencils, keyrings, sweets, candy canes, packets of popcorn kernels, other edible goodies, flavoured tea bags, cinema tickets, gig tickets, gift cards, bookmarks, craft and art supplies, mini votives or tea light candles, seed packets, homemade vouchers, letters, money... the possibilities are endless. The gifts just need to be able to fit in to the centre of the cracker, and not be too heavy or sharp enough to cause an injury if it flies across the table as the cracker is snapped! Nobody wants a bag of marbles or a pen knife flying at their head or breaking your Mum's best china! It's up to you whether you personalise each cracker for each guest or fill them with goodies your whole party will enjoy, but if you want to personalise them, you can easily do this by catering to each person's hobbies and interests, and by selecting age appropriate and even gender-specific items. For instance, crackers filled with make up would go down well with your beauty-loving girlfriends, edible treats are perfect for foodies, and toys will always be well-received by children.


I originally tied my crackers using the silver curling ribbons provided, but after I finished, I decided to switch them for some red organza ribbon to make them look even prettier. I think it gives them a little something extra, and makes them look a little more tasteful. I love how it now looks like the nutcrackers are wearing red scarves! 


I'm also considering adding some jingle bells, mini baubles, or pom poms to embellish the crackers, but I need to see what I have left over once I've finished my present-wrapping. If you want to add your own touch to your crackers, you could tie them with ribbons, string, raffia, lace trims, strips of fabric, tinsel, or even strawberry laces. To decorate them, you could use Christmas decorations, present toppers, stickers, Christmas tree chocolates, silk flowers, fresh foliage, buttons, sequins, glitter, fabric... whatever inspires you. Just let your creativity run wild!

Hobbycraft's cracker kits are currently all sold out online, but check in store, as they may still be available. If you can't track them down in store, Litle Crafty Bugs also have a fantastic selection of cracker kits here in countless festive and non-festive designs. You can buy cracker kits from lots of other shops and craft stores these days, including Amazon and eBay, so be sure to have a good trawl through Google to find your perfect cracker kit.

You could also make your own crackers by downloading a cracker template from the Internet, and cutting out your own crackers from card or thick paper. You could use festive patterned or coloured card or use something plain and decorate it yourself. Really, you're only limited by your imagination and willingness to experiement. You'll just need to source your own cracker snaps, hats, and jokes, which you can usually buy from most craft stores at this time of year. Hobbycraft still have a set of cracker hats and jokes available online here.


It's so much fun making your own crackers instead of buying them ready-made, and once you start making them, you'll never want to buy a pack off the shelf again! They'll look beautiful on your dinner table, and everyone will love the personal touch of your handmade crackers.

I'm really pleased with my Hobbycraft Nutcracker Christmas crackers, and I know they're going to go down well with my family on Christmas Day. They always do. I'm looking forward to seeing everyone enjoy them, and finding out if anyone will win anything from the scratch cards. Not long to wait now!

Have you ever made your own Christmas crackers? Will you be making your own this Christmas?

You Might Also Like
SHARE:

Tuesday, 10 July 2018

My Handmade Felt Spring Flower Wreaths


In January, I set myself a list of goals for the year, and one of those goals was to make a spring wreath. Now here we are in July, and I'm proud to say I've smashed my goal by not only making one spring wreath this year, but four!


I originally intended to make a pom pom wreath with a few felt flowers mixed in, similar to the ones I made last Christmas, but as I got stuck in to the project, I changed direction and decided to ditch the pom poms and made floral wreaths almost entirely out of felt instead.

I started the project back in March, hoping to have the wreaths ready by Easter, but it took a lot longer than I had anticipated. Each stage was time-consuming, with each flower taking up to half an hour to make, and the leaves taking three hours to glue to each wreath alone. I was also hindered by my pain which only allowed me to spend up to an hour on them a day, so I didn't complete my last wreath until early June.

Okay, I might not have finished them in time for spring, but I like to think I'm ahead for next year!


I'd never made anything like them before, but I didn't follow any tutorials (except for how to make the roses, which seemed too complicated to figure out without a little help- they weren't), and made it all by hand through trial and error. I admit, I did have to Google for templates for the petals and leaves because I'm not brilliant at drawing free-hand, and needed something to draw around, but I made everything else up as I went along, using photos of flowers as a guide. I taught myself how to make felt daffodils, tulips, and pansies (with hand-embroidered faces), and enjoyed learning how to make felt roses using this tutorial from The Flower Art. Making the flowers was fun and super satisfying; after a while, I could almost do them with my eyes closed, and began to feel like a felt florist as felt flowers overflowed from jars and bowls around me. Once I got started, I found I couldn't stop making them! It's an addictive process.

I tried to make the flowers look as realistic as a felt flower can, and used a variety of bright and pastel felt sheets from Hobbycraft and The Felt Fairy in shades of yellow, pink, purple, peach, orange, and white, with three to four shades of green for the leaves. Two of the wreaths I made are made of pastel-coloured flowers, while the other two are a little bolder. Unfortunately, I haven't captured the true colours of the felt well in the photos as I suck at photo editing and couldn't get the photos right, but they're much deeper and brighter in real life. The yellow daffodils are bright and cheerful, and the dark green leaves are grass green, not forest, but you get the idea. I can't decide which style I like best- although, I decided to keep the second wreath I made with the purple ribbon, so perhaps I prefer the deeper coloured flowers after all.


To make the wreaths, I began by wrapping spring green wool tightly around one ring of a wooden embroidery hoop for the base, which took about an hour and a half for each one. The next step was attaching the felt leaves to the hoop with a hot glue gun, I used three shades of green felt for the leaves, and it took about three hours just to glue them on to each one- and that's not counting the time it took to cut them all out first. Once the leaves were in place, I played around with different arrangements of the flowers I'd pre-made until I found a look I liked, and then spent a couple of hours gluing them securely to each wreath. To finish the wreath I've completed, I tied a length of pretty ribbon to the screw of the hoop to hang it from (although, for the inner hoops, which don't have a screw on top, this is best done before you glue on the leaves, as you have to tie the ribbon around the embroidery hoop).

I still need to buy ribbon to finish the last three wreaths as I haven't got anything suitable in my stash, but other than that, my felt spring wreath project is complete!


Obviously, I'm not a craft blogger, but I had hoped to blog a tutorial to show you guys how to make a felt spring wreath, but spring has been and gone, and now summer is swiftly ticking away, I guess it's going to have to wait until next spring instead. If anyone wants to know how I made anything, though, just send me a message, and I'll try to talk you through the process. I am planning to show you how to make a felt Christmas wreath before the year is through, though, so watch out for that this November / December! 

I've moved on to making felt Christmas wreathes already, so that they'll actually be ready to hang on time this Christmas, and have been busy making red felt poinsettias and roses over the last few weeks. I'm going to figure out how to make felt amaryllis flowers next. Once you get started, it's hard to stop! 

Without meaning to toot my own horn, I'm really pleased with how well the felt wreaths came together, and proud of them for a first attempt at felt flower / wreath-making. Apparently, you really can do anything when you set your mind to it!

Have you ever tried to make a felt wreath or flower? What was the last thing you crafted?

You Might Also Like
DIY Christmas Pom Pom Wreaths
SHARE:
Blogger Template Created by pipdig