Saturday, 11 April 2020

DIY Pastel Pom Pom Easter Crackers


Last Easter, I made some pastel-coloured Easter crackers to make our family Easter meal that little bit lovelier. I never did find the time to blog about them last year, but I saved the photos and thought I'd show you them today in case you fancy making some of your own this Easter weekend. (Of course, it's a little too late to purchase cracker kits in time for Easter now, but you could download a cracker template from the Internet and print your own on some colourful card).


My family and I always have an Easter roast on Easter Sunday and I like to make our table look as colourful as possible, so I decided to make crackers in a variety of pastel colours to compliment our colourful, mismatched Easter table linens and crockery.

I bought a selection of single cracker kits in lavender, pastel yellow, pale blue, and flamingo pink from the craft and party supply website, Little Crafty Bugs, who stock a wide variety of inexpensive cracker kits in different colours and sizes for every event imaginable. Their cracker kits are so good I've repurchased several times over the last few years whenever I've made crackers for Easter or Christmas, and even put in another order last week to make another batch for tomorrow's Easter meal, which I'm hoping to make later today. I then picked up some small pom poms from Hobbycraft, and chose satin ribbons in contrasting pastel colours from my stash to decorate them with. For the filling, I decided to treat everyone to some caramel chocolate bunnies from Hotel Chocolat (which are just amazing), and also bought a scratch card to pop in each one. (Sadly nobody won the gold). Then I got to work.


The crackers were so easy to make, and as I kept the designs simple, they didn't take long to make at all. I think I made all six in under half an hour. The process is really simple, and here's how to make them if you'd like to give cracker making a try. 


How To Make These Crackers

What You'll Need

♥ 1 cracker kit per person.
♥ 2 lengths of ribbon per cracker. (I used satin ribbons from Hobbycraft).
♥ 2 pom poms per cracker.
♥ Scissors.
♥ Hot glue gun and glue.
♥ Mini chocolate Easter bunnies, eggs, or whatever contents you desire. (I used caramel chocolate bunnies from Hotel Chocolat).
♥ Confetti (optional).

What To Do

1. First, take your flat-packed cracker, and stick a cracker snap in place with Selotape length-ways down the centre of the cracker.
2. Push out all of the diamond card pieces from the diamond cut-outs.
3. Roll the card in to a cylinder shape, and slot the three tabs in to the three slots.
4. Take a length of ribbon, and positioning it under the diamond cut outs, cinch it in and tightly tie it in place. This will pull in the end of the cracker and create the traditional cracker shape. Cut the ends of the ribbon diagonally to prevent them from fraying.
5. Place a paper crown and a joke in to the cracker, and drop in your confetti and contents. I popped caramel chocolate bunnies from Hotel Chocolat and a scratch card in mine, but you could add in whatever small treats you like.
6. Tie up the other end of the cracker by repeating step 3.
7. Heat up your glue gun, and glue a couple of pom poms along the centre of the cracker. Leave to dry for a couple of minutes. And voila, you're done!

Simple as that.

As well, as making pastel Easter crackers for our meal, I also made a couple more in rose pink and yellow, which I sent to my sister and brother-in-law in their Easter parcel last Easter.


The crackers seemed to go down really well with my family, and they were just so fun to make. I think they added a little something extra to our Easter dinner table, and definitely brightened up the table. And let's face it, who doesn't love snapping open a cracker full of chocolate?


I liked these pastel pom pom crackers so much, I think I'm going to do something similar with this year's Easter crackers. I obviously couldn't get scratch cards to put in them this year, but I have managed to pick up some more Hotel Chocolat Easter chocolates online to give my family a treat. I'll be sure to post a photo of them on my Instagram, so keep an eye on my grid and stories this weekend if you'd like to see what I come up with.

Have you ever made Easter crackers for an Easter meal or party?

You Might Also Like
SHARE:

Saturday, 15 December 2018

DIY Hobbycraft Nutcracker Christmas Crackers


On Thursday, I finally found the time to make this year's Christmas crackers and take the photos I needed to blog about them, so of course, I'm here to blog about them today.


If you're a long-time reader of my blog, you'll probably know that I love to make my own Christmas crackers and do so every year. I've been making them instead of purchasing a generic ready-made set for around a decade now, and it's something I look forward to doing every Christmas.

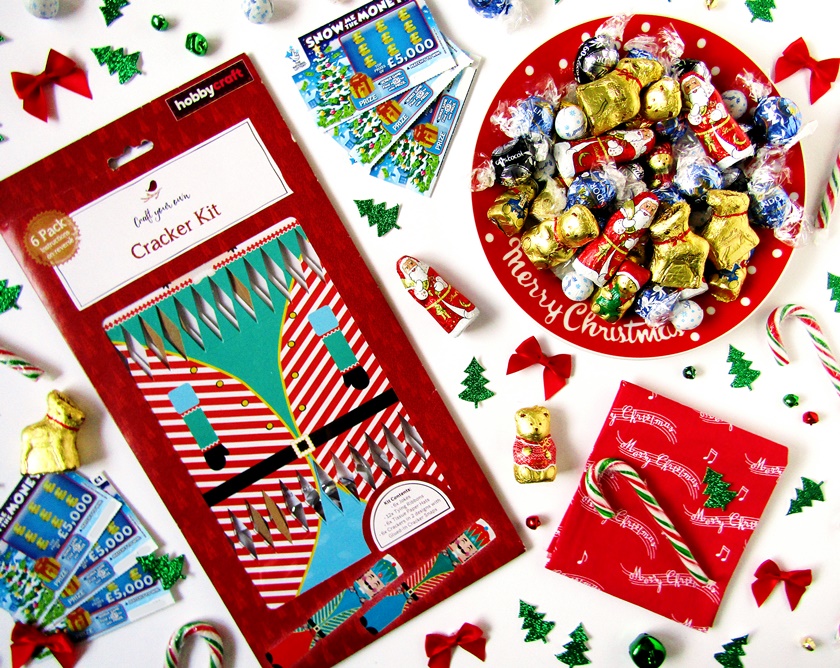
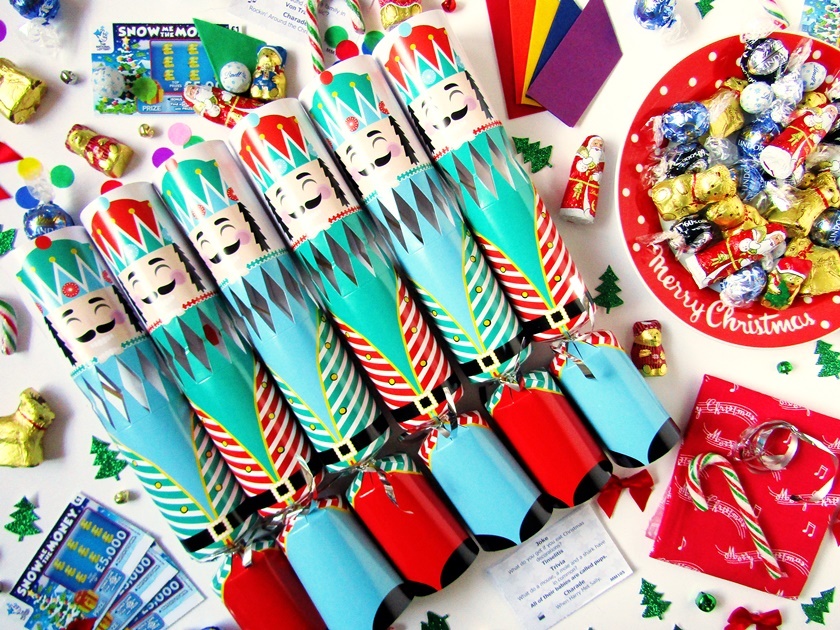
I was tempted to make my own crackers entirely from scratch this year, but then I saw this amazing Nutcracker Christmas cracker kit in Hobbycraft for just £4, and they looked so cute, I just couldn't resist them. This set of six crackers features a nutcracker design in vibrant red, blue, and green, with stripes and accents of yellow, black, and white. As you can see, they come in two complimenting colour-ways, and the set includes three of each design.


The crackers come flat packed ready for you to make, and the set includes cracker snaps, paper crowns, jokes, and silver curling ribbons. You just need to buy little gifts to fill them with, and then you can start constructing them.


These crackers are so ridiculously easy to make that almost anybody could make them- including children. All you have to do is roll the cracker in to a cylinder shape, slot the three tabs in to the slots, cinch one end with ribbon, fill it with treats, tie up the other end, and voila, you're done! I can make all six crackers in as little as ten or fifteen minutes (when I'm not stopping to take photos as I go along), but on your first attempt, it may take you a little longer to get the knack. You'll definitely be able to make them within half an hour, so it's the perfect craft to enjoy if you want to do some Christmas crafting but have little time to spare during the hectic festive season.


This year, I've filled my crackers with colourful confetti, Christmas scratch cards, and a selection of festive Lindt chocolates. I was planning to do something a little different this year, but my Mum came back from Costco last month with a huge pack of Lindt chocolates for me to use, and I was hardly going to turn away free chocolate. They'll definitely be a welcome treat on Christmas Day. I also decided to add a £1 scratch card to every cracker as an extra surprise, and to make Christmas dinner that little more exciting. It's unlikely anyone will win the jackpot, but you never know, it could happen, and the possibility of winning a couple of quid is always fun. Fingers crossed they're all winners! 

Helpful tip: if you want to add a scratch card to your crackers, make sure you stick a penny to the back with washi tape so everyone can enjoy them around the dinner table!


Of course, you don't have to stick to chocolates or scratch cards when filling your own crackers; you can fill them with all kinds of small treats. You could use: mini beauty products, make up, nail polishes, lip balms, hair accessories, costume jewellery, small toys (figurines, wind up toys, bouncy balls etc.), stickers, pens and pencils, keyrings, sweets, candy canes, packets of popcorn kernels, other edible goodies, flavoured tea bags, cinema tickets, gig tickets, gift cards, bookmarks, craft and art supplies, mini votives or tea light candles, seed packets, homemade vouchers, letters, money... the possibilities are endless. The gifts just need to be able to fit in to the centre of the cracker, and not be too heavy or sharp enough to cause an injury if it flies across the table as the cracker is snapped! Nobody wants a bag of marbles or a pen knife flying at their head or breaking your Mum's best china! It's up to you whether you personalise each cracker for each guest or fill them with goodies your whole party will enjoy, but if you want to personalise them, you can easily do this by catering to each person's hobbies and interests, and by selecting age appropriate and even gender-specific items. For instance, crackers filled with make up would go down well with your beauty-loving girlfriends, edible treats are perfect for foodies, and toys will always be well-received by children.


I originally tied my crackers using the silver curling ribbons provided, but after I finished, I decided to switch them for some red organza ribbon to make them look even prettier. I think it gives them a little something extra, and makes them look a little more tasteful. I love how it now looks like the nutcrackers are wearing red scarves! 


I'm also considering adding some jingle bells, mini baubles, or pom poms to embellish the crackers, but I need to see what I have left over once I've finished my present-wrapping. If you want to add your own touch to your crackers, you could tie them with ribbons, string, raffia, lace trims, strips of fabric, tinsel, or even strawberry laces. To decorate them, you could use Christmas decorations, present toppers, stickers, Christmas tree chocolates, silk flowers, fresh foliage, buttons, sequins, glitter, fabric... whatever inspires you. Just let your creativity run wild!

Hobbycraft's cracker kits are currently all sold out online, but check in store, as they may still be available. If you can't track them down in store, Litle Crafty Bugs also have a fantastic selection of cracker kits here in countless festive and non-festive designs. You can buy cracker kits from lots of other shops and craft stores these days, including Amazon and eBay, so be sure to have a good trawl through Google to find your perfect cracker kit.

You could also make your own crackers by downloading a cracker template from the Internet, and cutting out your own crackers from card or thick paper. You could use festive patterned or coloured card or use something plain and decorate it yourself. Really, you're only limited by your imagination and willingness to experiement. You'll just need to source your own cracker snaps, hats, and jokes, which you can usually buy from most craft stores at this time of year. Hobbycraft still have a set of cracker hats and jokes available online here.


It's so much fun making your own crackers instead of buying them ready-made, and once you start making them, you'll never want to buy a pack off the shelf again! They'll look beautiful on your dinner table, and everyone will love the personal touch of your handmade crackers.

I'm really pleased with my Hobbycraft Nutcracker Christmas crackers, and I know they're going to go down well with my family on Christmas Day. They always do. I'm looking forward to seeing everyone enjoy them, and finding out if anyone will win anything from the scratch cards. Not long to wait now!

Have you ever made your own Christmas crackers? Will you be making your own this Christmas?

You Might Also Like
SHARE:

Friday, 30 March 2018

Colourful Easter Crackers


I've been having another crafting binge over the last few weeks. I've made some polka dot hoop art, been working on some spring wreaths, made some bandannas for my dog, and a couple of days ago, I put together some Easter crackers for our Easter meal on Sunday. I'm really pleased with how they turned out, so I'm here to give you a peek at them today.

My family and I always sit down to an Easter meal together on Easter Sunday, and this year I decided I wanted to make some Easter crackers for us to enjoy during our meal for the very first time to make Easter lunch that little bit lovelier. It's something I've wanted to do for years, so I knew I had to finally give it a go.

When I began thinking about making Easter crackers, I originally thought about making Easter crackers entirely from scratch, but knowing that would probably end in disaster, I began looking in to Easter cracker kits online instead. I soon discovered an online shop called Little Crafty Bugs, who stock a wide variety of craft supplies and an extensive selection of cracker kits for every occasion imaginable, and found exactly what I was looking for. 


While they do offer a range of Easter cracker kits, I actually found myself drawn to their plain coloured crackers, and decided to buy six of their single standard-sized crackers in six different colours- rose pink, sea blue, yellow, emerald green, lime green, and pastel yellow- to make our Easter table as colourful as possible. Well, you guys know how much I love colour!

My order arrived within a week, and I'm pleased to say, I wasn't disappointed. They were perfect for what I had in mind.

As I discovered, the crackers are all made from reasonably thick, good-quality card, and the colours are lovely and vibrant. Like traditional Christmas crackers, each cracker kit comes with a paper crown and a joke, as well as a cracker snap to give each cracker that satisfying pop when you pull them over the dinner table. I was surprised to find that they didn't come with ribbon or string to tie the ends of the crackers with, but as I was already planning to use colourful ribbons from my stash, it wasn't a problem for me. Just be aware that you'll need to source your own ribbon, twine, or raffia in order to make these crackers.


I was finally able to make my crackers this week, and it really couldn't have been easier. I had all six crackers made within fifteen minutes. I had originally hoped to blog a tutorial in advance with step-by-step photos, but I've been so under-the-weather lately, it's been left to the last minute again, and a tutorial won't be much use to you now. I only managed to snap photos of before and after, because my pain levels were too high, and I had to rush through it to get back to bed, but they were super easy to make, and I'll try to talk you through the process instead. Of course, it's probably too late to order these cracker kits in time for Easter now, but you could still make your own crackers from scratch by downloading a cracker template from the net and using some colourful card.


How To Make These Crackers

What You'll Need

1 cracker kit per person.
2 lengths of ribbon per cracker. (I used satin ribbons from Hobbycraft).
Scissors.
Mini Easter eggs, or whatever contents you desire. (I used a selection of mini Lindt eggs).
Confetti (optional).

What To Do

1. First, take your flat-packed cracker, and stick a cracker snap in place with Selotape length-ways down the centre of the cracker.
2. Push out all of the diamond card pieces from the diamond cut-outs.
3. Roll the card in to a cylinder shape, and slot the three tabs in to the three slots.
4. Take a length of ribbon, and positioning it under the diamond cut outs, cinch it in and tightly tie it in place. This will pull in the end of the cracker and create the traditional cracker shape. Cut the ends of the ribbon diagonally to prevent it from fraying.
5. Place a paper crown and a joke in to the cracker, and drop in your confetti and contents. I used a selection of mini Lindt eggs for mine, but you could add in whatever small treats you like.
6. Tie up the other end of the cracker by repeating step 3, and voila, you're done!


You could also decorate your crackers any way you desire. I was originally intending to embellish mine with some Easter fabric, pom poms, ribbons, and silk flowers, but once I made them, I decided I liked the bold colours with the contrasting coloured ribbons I used as they were, and chose to keep them simple. I think the colours make a great statement on their own, and they'll go perfectly with our colourful new Easter placemats and napkins we recently picked up from John Lewis. (I'm still hoping to source the matching table runner, but it's currently out of stock online).

If you like the look of these crackers but not the colours I chose, don't worry; the Little Crafty Bugs crackers come in lots of other colours and sizes, too, and you can also buy them in multi-packs of up to 1000! With so many different options, you should have no problem finding exactly what you need to match your table decor, and cater to your guests / family no matter the occasion. You can find Little Crafty Bugs' selection of cracker kits here.

I couldn't recommend them more. I love how great my crackers turned out, and I'm looking forward to surprising my family with them on Sunday. Here's hoping they go down well with everyone.

Will you be making your own crackers for your Easter meal or party this Easter?

P.S. Apologies for how atrocious today's photos are. I took them in low light, and just cannot make them look good. I'm hoping I'll be able to replace them with better ones over the weekend.
SHARE:
Blogger Template Created by pipdig