Monday, 20 April 2015

Review | Barry M Speedy Quick Dry Nail Paints


Barry M has been one of my favourite nail polish brands since my early teens, so when I saw their new Speedy Quick Dry collection in Boots last week I couldn't wait to give them a try.

The collection is made up of the prettiest, delicate pastel colours, and I had a hard time narrowing down which ones to road test first. The polishes were on 3 for 2 in Boots, so of course I just had to buy three. 


I chose a cheerful flamingo pink called 'In A Heart Beat.'

A fresh Spring green called 'Pole Position.'

And a fashionable blue, somewhere between duck egg and mint, called 'Road Rage.'

Three very pretty shades that were made for the perfect Spring manicure!


I wasted no time in trying them out, and used them all in one manicure later that same day. I have to say, I was impressed with how well they handled. The polishes all have wide flat brushes which make applying each coat super easy; the width helps to cover a lot of nail in one swipe, so it takes no time at all to apply each coat.  

I needed 3-4 coats to achieve an opaque finish, and it took less than a minute for each coat to dry! Both hands were done and bone dry within fifteen minutes. I don't know about you, but I hate waiting an age for my nails to set, so this Speedy Quick Dry formula is a God send! 

They're the perfect polishes for anybody who has limited time to get ready, and for people who have a difficult time sitting still long enough for their nails to dry. I've lost count how many times I've smudged my nails because I've not left enough time for them to dry properly, but I haven't had that problem with these three polishes. I'm sold. They even stayed in place for three days without chipping!


My only real issue was that 'Road Rage', the duck egg blue, went on a little bumpy unless the brush was drowned in polish. The brush kept sticking against the nail, instead of gliding over it, which I think was down to the quality of the brush and not the formula.  With a little patience, I worked around it by flooding the brush, but it took a little longer to brush off the excess polish to get an even finish.

Aside from that little issue, I really love these nail polishes. They're easily some of the loveliest pastel polishes I've ever worn. I still can't decide which is my favourite; it changes from minute to minute. I'm leaning towards the pink right now, but in five minutes I'll say green or blue. All three shades are fresh, bright, and cheerful- and you just can't go wrong with pastel polishes like these for Spring.


The Speedy Quick Dry polishes are very affordable at £3.99 each, and should be available in all good pharmacies / drug stores like Boots and Superdrug. 

Have you tried their Speedy Quick Dry nail paints yet?

PS. Apologies for the state of my nails in these photos. I know it's pretty much the worst looking manicure ever. I have really shaky hands these days (from the pain and painkillers), so I currently have the artistic ability of a three year old! I don't have the patience to try again, but I decided just to blog these photos anyway, as I wanted to share these polishes with you.
SHARE:

Monday, 2 September 2013

Barry M Blueberry and Blue Grape Gelly Hi Shine Nail Paints Review

Morning folks,

So, I popped in to Boots last week to pick up a few essentials (read: three packs of cleansing wipes and a face scrub), and couldn't walk past the Barry M display without having a quick peek at the nail polishes. To be honest, I never can; Barry M has such a great range of nail products and the bold colours never fail to lure me in. 

I was actually looking to replace two dried up old bottles, but those particular colours weren't in stock, so I came home with two of their Gelly Nail Paints I'd never tried before, instead. 


I chose two different shades of blue; a bold cobalt blue called Blue Grape, and a a paler blue somewhere in between baby and cornflower blue called Blueberry... Do I get an award for how many times I said blue in that sentence? I'm not sure I said it enough times. Blue.

So, why did I choose these two nail polishes? Quite simply, because they were the first two colours that caught my eye, and I'd been previously impressed with other colours in the range. I was pretty confident that they'd be just as good as the others I'd tried... but, was I right?

 Just before the weekend, I took these nail polishes for a test drive, and created this simple nail look.

And... I wasn't disappointed! These polishes were just as good as the others in my collection. 


Firstly, these nail polishes glide on to the nail so easily, with no stickiness from the brush as it paints the nail. Very little effort is needed! The brushes are long and easy to handle, and the nail polish is fast drying. Each coat was dry in less than two minutes. I applied three coats to achieve optimum opaqueness, but in all honesty, two coats would have been more than sufficient as the consistency is reasonably thick. 

These Hi Shine Gelly Nail Paints are just how they sound: highly shiny. I love how glossy they are; they have the look of a professional gel manicure without the price tag, commitment, and upkeep- and that, ladies, is fine by me!


I painted my nails an hour or two before bed, and when I woke up, the nails were still as smooth as a pane of glass! That rarely ever happens; I often wake up with horrible tacky, textured nails when I paint them before bed. Probably as I tend to slip a hand under the pillows as I sleep...


This manicure lasted four days without chipping or dulling, which I personally think  is a decent length of time compared to most nail polishes. Not bad for a £3.99 nail polish. Even better considering they were bought on a buy one, get one half price offer! 

So, all in all, I'm very impressed with both these nail paints. I can't actually find a single fault in them. I love the two colours equally; they paint and set beautifully; they last well; and the price points are very purse friendly. Fantastic! Once again, Barry M has got it so right!


I now have six Gelly nail paints in my collection, and I love all six colours, as different as they all are. My favourite is still probably the lilac 'Pricky Pear'. I'm very tempted to give some of the deeper, darker Autumnal shades a try for A/W, and knowing me, I probably will!

Have you tried Barry M Hi Shine Gelly Nail Paints yet? Which shade is your favourite?

SHARE:

Tuesday, 1 January 2013

A Look Back At My Nail Looks of 2012

2012 was a year of many different nail looks for me. I found sanity and enjoyment from trying out different colours, different combinations, a few new brands, and a little nail art.

It's become a great distraction for me from my back injuries, and sort of a therapeutic comfort! Painting my nails has been one of the few activities I've been able to do whilst confined to bed, and something which has made me feel like more of a civilised human being on the 'bad' days.

One of my resolutions of 2012 was to venture out from my predictable palette of reds, corals, and pinks which I stuck to almost exclusively in the past few years. It wasn't that I was afraid to wear other colours, it was just that I liked wearing those colours most. I think it's safe to say that I achieved this resolution in 2012, and then some!

Green and glitter//  Purple and violet// Rainbow nails// Beetle green nails- favourite!
Red with a hint of gold// Oxblood red polka Dots// Teal and glitter
Purple// Turquoise
Grey and teal with flowers// Forget me not blue with dots// Lilac// Tomato red and a striped ring finger


Over the last year...

 ~I've built up a vast collection of polishes of every colour of the rainbow.

~I've tried new brands I'd never used before, such as MUA, Nails Inc, Ciate, and Maxfactor.

~Although I still remain loyal to my old favourite Barry M.

 ~I wore a different colour or look to the day before almost every day.

 ~I attempted a little nail art.

~I layered glitter polishes over colourful manicures, something I hadn't done since my teens.

... and I loved it!

Just like I am with eye make up, I've become a nail polish chameleon! I no longer stay in the boring safe zone of classic reds, pinks, and corals. I wear almost any colour, and I've built up a steady arsenal of varnishes to play with. I've particularly enjoyed wearing greens and teals, especially a dark 'beetle' green which I never would have worn a year ago!  I also branched out to try more crackle polishes and started an obsession with layering glitter polishes over most manicures in the last few months, something I'd shied away from since my teens. I began trying a little nail art, which I'll admit so far is nothing to write home about, but I was proud of my oxblood polka dot nails, and aim to try more designs in 2013.

My Favourite Polishes of 2012

It's hard for me to narrow down my favourites, as I have so many of them now, but these are the ones which I probably use most...

Barry M Racing Green
Barry M Bright Red
Barry M Ruby Glitter
Inglot Nail Enamel 024
Bourjois So Laque! varnish in Bleu Fabuleux

Favourite Brands

My favourite brands are still the same as this time last year: cheap and cheerful Barry M and luxury range, Inglot. The latter is fast drying, very chip resistant, and affordable, whilst the former is very purse friendly, long lasting, and easy to handle. Both ranges have a large selection to choose from, and I highly recommend both.

So, I'm proud of the variety of nail looks I tried in 2012. There were a lot of them! Some I showed you, some I didn't. I have a handful of new polishes yet to try, and lots of old ones I plan to try together. I'm certain 2013 will be a year of many, many new looks and hopefully a lot more nail art created with a better technique. Let's see where the new year takes me...

Which nail look was your favourite?

Do you try lots of different colours and looks, or do you tend to just stick to a couple of old favourites?
SHARE:

Wednesday, 5 December 2012

Amethyst and Teal Glittery Nails


Lately, I've found myself a little obsessed with trying out glittery nail polishes with most of my nail looks. I don't know where this little obsession has come from; up until a few months ago, I hadn't worn much glitter make up since my mid-teens. Perhaps it's because the festive season is upon us, and Christmas requires a bit of sparkle.

The other day, I gave myself a teal and glitter manicure; a combination I had never tried before. I was especially excited to try the Barry M glitter nail paint I picked up last week. Trust me when I say, that polish is beautiful!


I applied two coats of Rimmel's 60 Seconds polish in Sky High to all nails but the ring fingers. Two coats was enough to give an opaque finish; not bad for a budget brand! This polish is a light teal and it really does dry within a minute. I then added a light coat of the Barry M Amethyst Glitter to the tips of my nails, painting it over about a quarter of each nail.

 On the ring fingers I painted two generous coats of the Amethyst Glitter, and finished each nail with a couple of coats of the Inglot topcoat, mainly as I don't like the texture of glittery polishes, but also because it protects the nails and lets the polish last longer.


The Amethyst Glitter is such a beautiful blend of colourful glitters. Black dominates the nail (although in some lights it appears more silver), and it also contains pink and blue flecks, too. It's a stunning varnish, a bargain at just £2.99, and perfect for adding a bit of sparkle to your party outfits this festive season!

And... voila!


After two days, I'm still really loving this look! The colours are beautiful, and so far there have been no chipping incidents. I think this would be my Christmas party nail if I could join in the festivities this year, but I may just recreate it for Christmas Day instead.

Do you like to use glitter nail polishes? Can you recommend any to me?

What would be your go to nail look for the festive season?
SHARE:

Saturday, 1 December 2012

Sacre Bleu!


 I get bored of wearing the same colour on my nails for long, so usually find myself switching to another polish or look every two or three days. The last polish I fished out of my nail polish collection was this gorgeous forget-me-not blue Bourjois So Laque! varnish in Bleu Fabuleux. I don't think I'd worn it in a couple of months and wanted to wear something bright to brighten up a dull Winter's day.

 I applied two coats, and then for reasons I cannot fathom, I just started dotting little dots in a curved line on each of my nails with my white WAH nail art pen. My hands shake constantly thanks to the pain I'm in and the painkillers I have to take for my disc injuries, so I haven't quite perfected consistent dots or the perfect technique, but I was happy with the result. I think that they looked quite pretty from arm's length, just not so great close up. I think I'll try this look again, perhaps with different colours, or more than one line.

The polish chipped within twelve hours (most of which I was asleep!), so although I love the colour of the polish, how easily it applied, and how quickly it set, these Bourjois polishes don't seem to have much staying power. It's a good thing I like to redo my nails often.
P.S. I just wanted to say a quick hello to all my new followers... hello! Thank you very much for following; it's lovely to have you here. Don't be afraid to say hello, I don't bite! :)

SHARE:

Tuesday, 30 October 2012

Nails | Grey and Teal Floral Nail Art

Yesterday evening I tried my hand at floral nails. I've never attempted them before, and the result was far from perfect, but they were fun to create and I'm sure with a bit of practise I'll be able to perfect the look.


I chose to alternate the nails with teal and grey nail polishes, and used white and blue nail art pens to create the flowers.

I used Barry M nail paints in Teal/334 and Grey/293, and Models Own WAH nail art pens in white and blue.


The teal Barry M is one of my latest buys. I was attracted to it because it looked like the sea. It's a little bluer than it appears in these photos, and it's absolutely stunning. It was a great investment for just £2.99, and I think this has earned a place in my favourites.

I painted three coats of this polish on alternating nails, leaving them to dry completely before beginning the flowers.


I've had the grey nail paint for over a year, and had barely used it. I had a brain wave on Sunday night about wearing it alongside the teal, so I excavated it from the nail drawer and the look was born.

Again, I painted three coats (but two would have been sufficient) on alternating nails, and left them to dry thoroughly.

To create the flowers, I used the white nail art pen to dot about six dots in a circle to create petals, and finished each flower with a blue dot to the centre. I painted them in different areas on each nail so they wouldn't look too matchy. 

I had a little difficulty overlapping the dots without causing them to bleed in to each other; a few of them turned in to smudged blobs due to my shaky hands. But, that's all part of the experience, and I'm happy with the result. They don't look too bad from a distance!


I made such a mess of my thumb nail! Oops. Oh well...


And voila! Grey and teal floral nails!

Have you tried or perfected floral nails yet? 

If you've got any tips I'd love to hear them!
SHARE:

Friday, 26 October 2012

Golden Glittery Autumnal Nails

Lately, I've taken to painting my nails in the middle of the night when I can't sleep. In the early hours of the morning whilst the majority of Britain slept, I was wide awake experimenting with a couple of polishes and curiously creating a new look.

I dressed a bronze-gold polish with a layer of pink and black glitter, and I'm in love with the result!


I haven't worn a brown or bronze nail in at least a decade, and I'm really not sure why. I had seen NYC polishes in beautiful Autumnal tones on several blogs, and was particularly taken with a lovely rustic colour, so I made it my mission to track it down when I visited Superdrug last week. And find it I did. I was curious to what the big deal with budget brand NYC's cosmetics was all about, and for just £1.79 I felt it was worth finding out.


For this look I used:

 NYC In A New York Color Minute Quick Dry Nail Polish in Backstage Brown.
Barry M Nail Paint in Ruby Glitter.
and Inglot Techno UV Top Coat.

I applied two coats of the NYC Backstage Brown, and found it worked like a dream. It has a tapered lid which was easy to hold and control the brush strokes, and a long enough brush to reach the bottom of the pot. The nail polish painted with ease, and dried swiftly and smoothly. Even after the second coat was applied the texture remained flawlessly polished. I'm very impressed with my first experience of this polish, and am in love with the elegant bronze-gold colour. It's accessorises perfectly with a backdrop of Autumn leaves!

Once these two coats were dry, I then painted a layer of Barry M's Ruby Glitter over the top. It's best to paint this in quick fluid strokes (just one to the middle and one either side). If numerous strokes are applied on top of each other than it tends to dry rather gloopy. I've used this polish a couple of times since I bought it a week or so ago, and it's become my new favourite polish. It's a clear varnish with black and hot pink flecks of glitter, and it makes my nails look so pretty!

To finish I used my Inglot top coat to seal and protect the glittery layer. My pot is a little discoloured from nail polish remover wipes, so please excuse it's appearance.


And voila! Glittery golden nails. They still need tidying up, but I think I've found my new favourite nail look for Autumn.


I just know I'll be recreating this look repeatedly this season.

Pretty great nails for two budget brands, I must say!

Have you used these polishes before? Have you tried NYC or Barry M nail polishes yet?

What do you think?

P.S. I may have an outfit post for you soon. I'm off to see if I any of my photos can be shared.
SHARE:

Wednesday, 17 October 2012

Nails | Oxblood Polka Dot Nail Art

Last night I attempted polka dot nails for the second time with a nail art pen. While they're far from perfect thanks to my unsteady shaking hands (medication side effect) and my inability to file my nails properly, I'm pleased with the result.

They were so easy to do!


I painted two coats of a gorgeous oxblood red polish on to each nail. I used my new Barry M nail paint in Raspberry/273. The colour is so on trend for Autumn, but it's also such a classic colour, and one of my favourite Autumn hues.

Once the nails were dry, I used the Models Own nail art pen in white (bought from ASOS) to add dots to my nails using the pen nib found in the lid of the pen. These nail art pens also come with a fine nail polish brush for creating thicker lines and patterns.


The pen is roughly the size of a pin, and it's fairly easy to control the amount of nail polish you want to use- it's all to do with how hard you squeeze the tube. Squeezing very gently, I started in the middle of each nail spacing the dots out to create a line. I then followed the same rule in the adjacent rows, but attempted to place the dots in line with the gaps in the middle line, and continued to use this method to create alternating dots until the nail was finished.

The nail art pen can create tiny freckles, or big splodgy polka dots.

The nails are far from perfect. The polka dots aren't even, equally placed, or matching, but they were fun to create and quick to put together. Polka dots are an easy design for any nail art beginner to try, and an equally easy way to give your outfit a little something extra.

I know I'll be recreating this look with every colour in my collection.

Have you tried polka dot nails before?
SHARE:

Tuesday, 9 October 2012

Nails | Rainbow Nails

Hey guys,

It's been quite a while since I last dedicated a post to my nails, which is quite frankly pathetic considering I paint my nails several times a week. I'm constantly picking up new shades and trying new brands. My nails transform in colour at least a couple of times a week. Simple treats like painting my nails make my days a little brighter. The thing is I tend to paint my nails in the middle of the night when I can't sleep, which makes for poor photos.

I'll try better, I promise!

Anyway, on Sunday night, I attempted to give myself a rainbow manicure; inspired by the image below which I found via Lauren Conrad's Pinterest.


I fell in love with this look the moment I saw it, so obviously I had to try it for myself...


And voila!

I'll admit, I didn't have the perfect shades of green or orange in my nail polish collection to create the perfect interpretation. I don't like the two shades of green in this look, as they're too metallic, and I had to use a coral to take the place of a pale tangerine. Apart from that, I think it's a fun look.

It took some concentration to make sure I applied the right colour to the right nail. I applied three coats to each nail, and finished one hand before I started on the other to avoid confusion.


On the left hand from left to right, I applied a coral (should ideally be orange here), yellow, green, cobalt blue, and an indigo blue. I later decided the indigo needed to be purple, and feeling lazy I just did a couple of coats over the top with a dark purple polish.


Left Hand

Left to right: (on nails and bottles):

I used all Barry M nail paints on this hand...

296 coral
307 lemon
284 emerald green
291 cobalt blue 
312 indigo/161 vivid purple
 

The right hand appeals to me more than the primary colours on the left hand.

Starting from the thumb, I used a bright red (my favourite!), orange (should ideally be a much lighter tangerine orange), light green, turquoise, and a med-dark purple. Again, I applied three coats to each.


 Right Hand

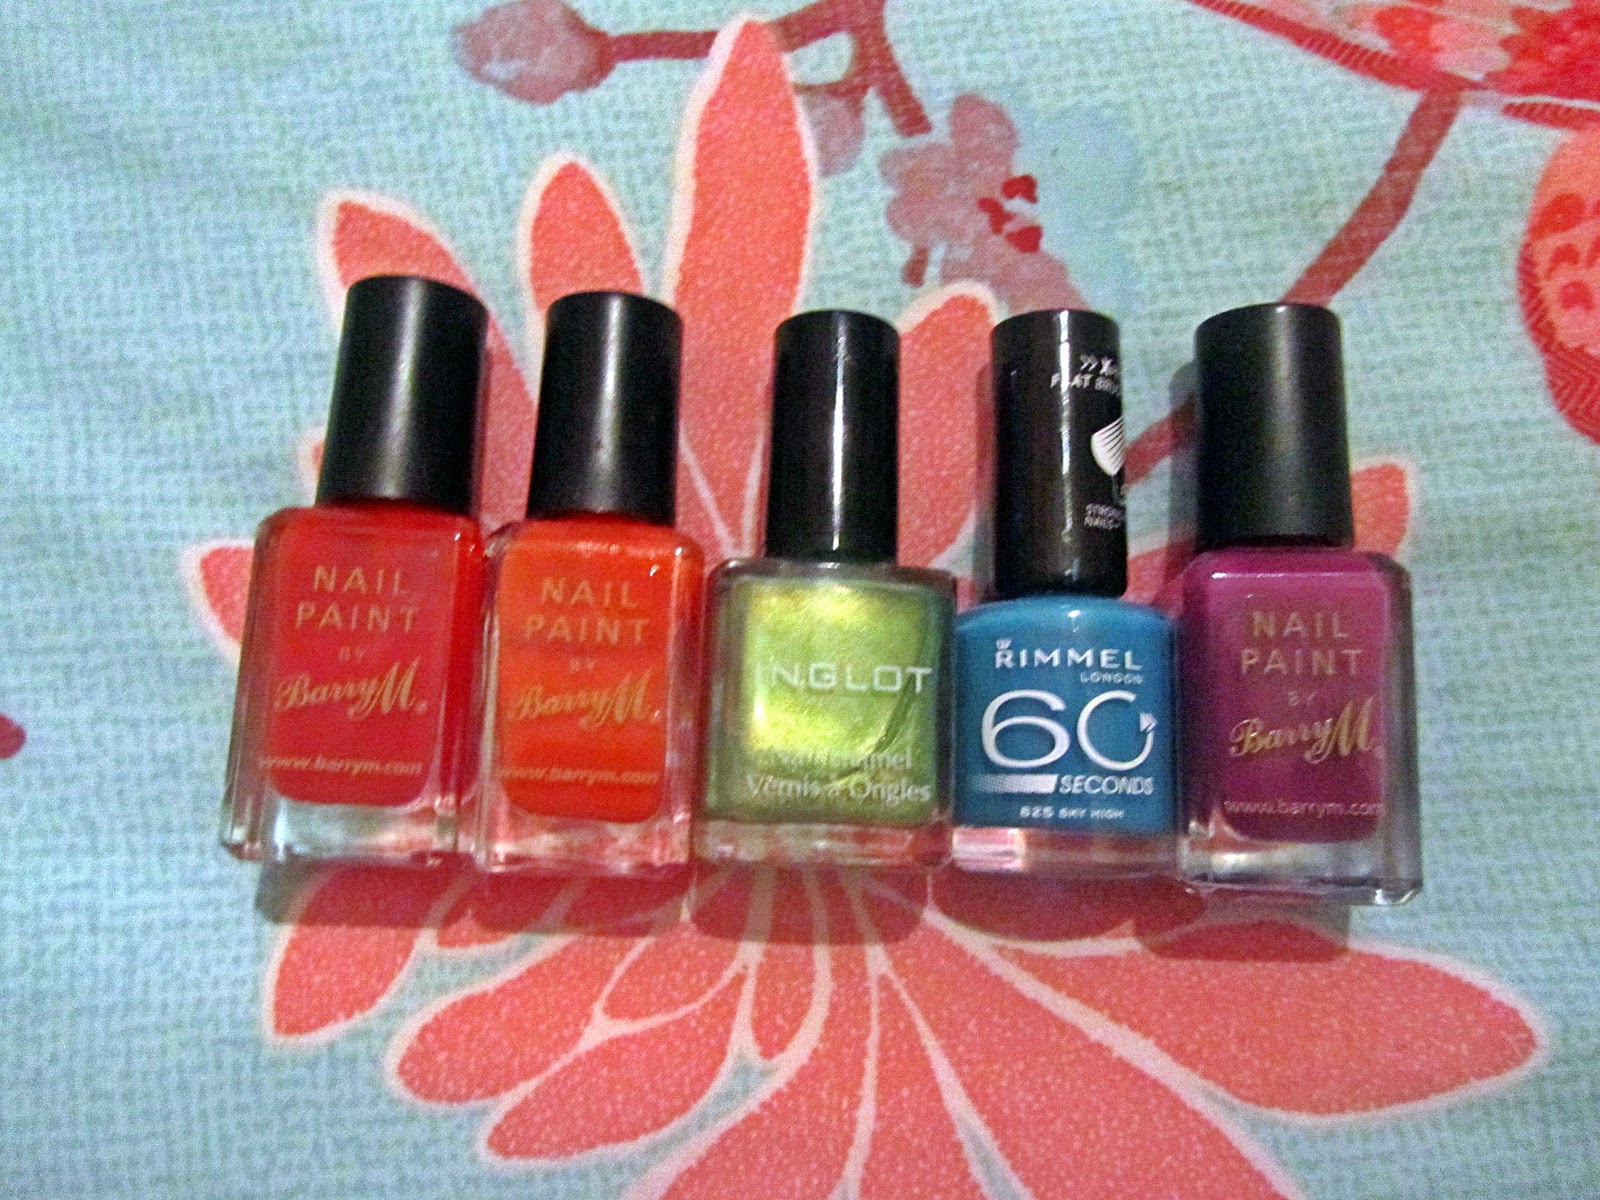
From left to right (on nails and bottles):


Barry M 262 bright red
Barry M 301 block orange
Inglot 319 
Rimmel 60 seconds 825 sky high
Barry M 303 bright purple

And again, this is the end result:


Probably the most fun and silly manicure I've ever given myself!

Painting your nails in all the colours of the rainbow is such an easy way to brighten up an outfit, or your mood! It's doesn't require any complicated artistic skills like most nail art, and is sure to make you feel about five years old by the time it's finished! I sure did, but hey, I don't take myself too seriously! I kept myself amused for an evening giving the look a try, and will definitely attempt it again once I pick up the green and tangerine colours I'm lacking.

Have you tried this fun look before?

If not, I urge you to give it a go, and satisfy your inner child with an explosion of colour!
SHARE:
Blogger Template Created by pipdig